딥러닝을 돌리겠다는 명분으로 비싸게 GPU를 사놓고 게임만 했다^^
게임은 하면서 바쁘다는 핑계로 계속 코랩만 쓰다가
jupyter 환경에서는 클래스 구조를 구성하기 어렵고 각종 모듈을 ctrl+클릭으로 눌러가며 바로바로 확인하기 어렵기 때문에 더이상 미룰 수 없게 되었다.
몇주간의 삽질과 함께 나..개발자 맞나? 하는 생각을 하며 자존감과 시간을 날렸다.
다시는 이런 낭비를 반복하지 않기 위해 모든 것을 리셋하고 처음부터 다시 차근차근 정리해보기로 했다.
먼저 나중에 파이썬 버전으로 충돌나는것을 막기 위해 미리 apt-get과 파이썬부터 업데이트를 해준다.
sudo apt update
sudo apt install software-properties-common
sudo add-apt-repository ppa:deadsnakes/ppa
sudo apt update
파이썬 버전을 확인한다.
python --version만약 파이썬이 설치되지 않은 경우 아래 명령어를 이용해 파이썬을 설치해준다.
파이썬 설치가 안된 경우! 이미 설치했다면 패스
sudo apt install python3.7
sudo update-alternatives --config python
config에서 에러가 난다면 경로 설정을 따로 해줘야한다. 그리고나서 버전을 다시 확인해본다.
sudo update-alternatives --install /usr/bin/python python /usr/bin/python3.7 2
python --version
Python 3.7.15
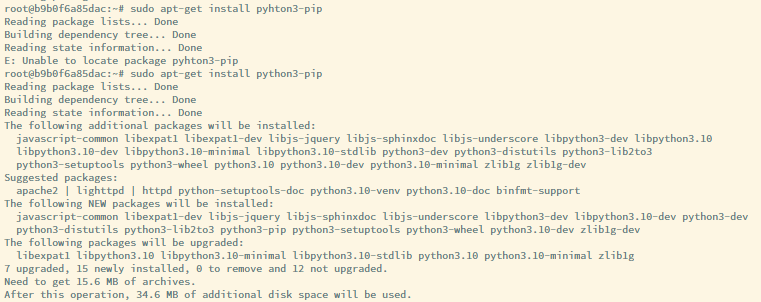
파이썬 버전이 잘 뜬다면 pip 패키지를 설치한다. 하지만 한번에 잘 될리가 없지!
sudo apt-get install pyhton3-pipE: Unable to locate package pyhton3-pip 에러가 난다.
왜...안되지? 싶어서 다시 해봤는데 된다

왜...되지...????????

패키지를 설치해준다.
python3.7 -m pip install package_name
설치가 잘 되다가 ModuleNotFoundError: No module named 'distutils.cmd' 에러가 난다
distutils을 따로 설치해준다(약간 누더기가 되어가는것같다^^)
sudo apt install python3.7-distutils
드디어 cuda를 설치하기 전 삽질하면서 남아있는 흔적들을 깨끗하게 정리해준다.
 sudo apt-get purge nvidia*
 sudo apt-get autoremove
 sudo apt-get autoclean
 sudo rm -rf /usr/local/cuda*
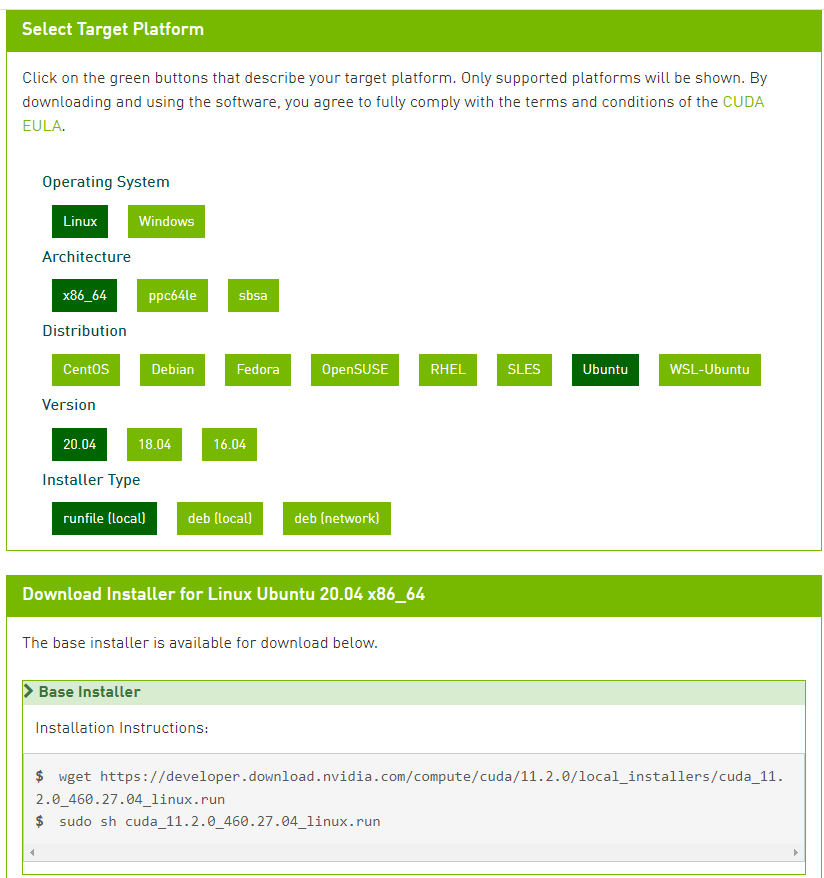
https://developer.nvidia.com/cuda-toolkit-archive 에서 원하는 버전을 고르고 자신의 환경에 맞는 것을 고른다.
다운받기 전에!!! 아래 항목에서 고른 cuda와 맞는 버전의 드라이브를 먼저 설치해준다!!
이 과정을 빼먹었을 때 계속 에러나고 삽질을 반복했다
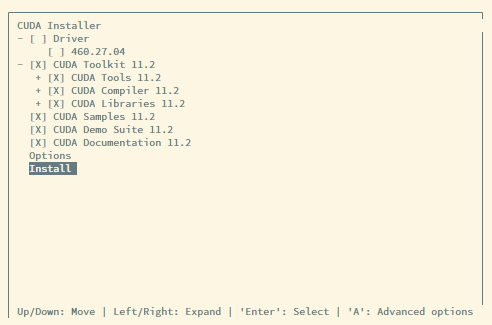
드라이브를 먼저 까는 경우 cuda를 설치할때 드라이브 체크를 해제해줘야 한다.
sudo apt install nvidia-driver-460중간에 언어를 선택하라는 부분이 나온다. 여기서 숫자를 입력하고 엔터를 쳐주면 된다.


명령어를 하나씩 차례로 입력해주면 다운로드 후 설치가 된다.
런을 해주면 새로운 창이 뜬다
나는 이미 깔려있던게 있어서 이런 창이 떴고 컨티뉴 해주면 된다.

Failed to verify gcc version. See log at /var/log/cuda-installer.log for details.
역시나 또 에러가 났다 로그 파일을 열어보니 다음과 같다.
vi /var/log/cuda-installer.log[INFO]: gcc location: /usr/bin/gcc
[INFO]: gcc version: gcc version 11.3.0 (Ubuntu 11.3.0-1ubuntu1~22.04)
[ERROR]: unsupported compiler version: 11.3.0. Use --override to override this check.예전에 깔아놓은 gcc버전이 현재 설치한 CUDA와 안맞다.
스택오버플로우에 버전 비교가 잘 정리된 표가 있어서 빌려왔다.
현재 내가 설치하려고 하는 버전은 11.2라서 10버전의 gcc가 필요한데 11버전이 설치되어 있어서 버전 충돌이 난다.
https://stackoverflow.com/questions/6622454/cuda-incompatible-with-my-gcc-version
- Check the maximum supported GCC version for your CUDA version:
- CUDA versionmax supported GCC version
CUDA GCC 11.4.1+, 11.5, 11.6, 11.7, 11.8 11 11.1, 11.2, 11.3, 11.4.0 10 11 9 10.1, 10.2 8 9.2, 10.0 7 9.0, 9.1 6 8 5.3 7 4.9 5.5, 6 4.8 4.2, 5 4.6 4.1 4.5 4.0 4.4
> GCC 다운그레이드
먼저 gcc 버전을 확인한다. 모르는사이에 g++도 함께 깔렸으니 버전을 함께 확인해준다.
gcc --version
g++ --version
gcc (Ubuntu 11.3.0-1ubuntu1~22.04) 11.3.0
Copyright (C) 2021 Free Software Foundation, Inc.
This is free software; see the source for copying conditions. There is NO
warranty; not even for MERCHANTABILITY or FITNESS FOR A PARTICULAR PURPOSE.
g++ (Ubuntu 11.3.0-1ubuntu1~22.04) 11.3.0
Copyright (C) 2021 Free Software Foundation, Inc.
This is free software; see the source for copying conditions. There is NO
warranty; not even for MERCHANTABILITY or FITNESS FOR A PARTICULAR PURPOSE.
혹시나 이미 설치를 한게 있다면 설치파일을 확인한다
sudo update-alternatives --config gcc
sudo update-alternatives --config g++
update-alternatives: error: no alternatives for gcc
나는 없어서 에러로 뜬다. 신경쓰지 않고 새로 설치한다.
# sudo apt install gcc-$MAX_GCC_VERSION g++-$MAX_GCC_VERSION
sudo apt install gcc-10 g++-10
그 다음 심볼릭 링크를 지정해준다
# sudo ln -s /usr/bin/gcc-$MAX_GCC_VERSION /usr/local/cuda/bin/gcc
# sudo ln -s /usr/bin/g++-$MAX_GCC_VERSION /usr/local/cuda/bin/g++

sudo ln -s /usr/bin/gcc-10 /usr/local/cuda/bin/gcc
sudo ln -s /usr/bin/g++-10 /usr/local/cuda/bin/g++
해당 위치에 폴더가 있지 않아서mkdir로 폴더를 만든 후 링크를 걸어주었다.
sudo sh cuda_11.2.0_460.27.04_linux.run 뒤에 --override를 붙여서 다시 설치한다
sudo sh cuda_11.2.0_460.27.04_linux.run --override

드디어 설치에 성공한것같다!
===========
= Summary =
===========

Driver:   Not Selected
Toolkit:  Installed in /usr/local/cuda-11.2/
Samples:  Installed in /root/, but missing recommended libraries

Please make sure that
 -   PATH includes /usr/local/cuda-11.2/bin
 -   LD_LIBRARY_PATH includes /usr/local/cuda-11.2/lib64, or, add /usr/local/cuda-11.2/lib64 to /etc/ld.so.conf and run ldconfig as root

To uninstall the CUDA Toolkit, run cuda-uninstaller in /usr/local/cuda-11.2/bin
***WARNING: Incomplete installation! This installation did not install the CUDA Driver. A driver of version at least 460.00 is required for CUDA 11.2 functionality to work.
To install the driver using this installer, run the following command, replacing <CudaInstaller> with the name of this run file:
    sudo <CudaInstaller>.run --silent --driver

Logfile is /var/log/cuda-installer.log
설치가 끝났으면 path설정을 해준다
.bashrc에 다음 내용을 추가해준다.
 # >>> cuda 11.2 >>>

  export PATH=/usr/local/cuda-11.2/bin${PATH:+:${PATH}}
  export LD_LIBRARY_PATH=/usr/local/cuda/lib64:${LD_LIBRARY_PATH:+:${LD_LIBRARY_PATH}}

  # << cuda 11.2 <<
저장한 내용을 실행시킨 후 nvcc를 통해 확인해준다.
source ~/.bashrc
nvcc --version
nvcc: NVIDIA (R) Cuda compiler driver
Copyright (c) 2005-2020 NVIDIA Corporation
Built on Mon_Nov_30_19:08:53_PST_2020
Cuda compilation tools, release 11.2, V11.2.67
Build cuda_11.2.r11.2/compiler.29373293_0
여기까지 성공!!

추가로 필요한 cuDNN은 다음 포스팅에 이어서 쓰겠습니다!
참고
https://sanglee325.github.io/environment/install-CUDA-11-2/#
Ubuntu 20.04 CUDA 11.2 설치
(2021-08-27) 기준
sanglee325.github.io
https://blog.koriel.kr/gcc-g-dareun-beojeon-cugahago-paekiji-gwanrihagi/
GCC, G++ 다른 버전 추가하고 패키지 관리하기
Dependencies -------------------------------------------------------------------------------- * Ubuntu * build-essentials Problems -------------------------------------------------------------------------------- 필자는 보통의 프로젝트를 빌드
blog.koriel.kr
https://askubuntu.com/questions/653324/remove-gcc-from-ubuntu
Remove gcc from Ubuntu
I want to completely remove gcc from Ubuntu. I am using gcc 4.9 which happens to be the latest version. How can I remove it completely from my system?
askubuntu.com
https://followers.tistory.com/16
ubuntu gcc, g++, python(설치, 업그레이드, 다운그레이드, 삭제, 버전 변경) (install, upgrade, downgrade, remove
1. 현재 사용하는 gcc, g++의 버전을 확인한다. $ gcc --version$ g++ --version:확인 2. 번경할 gcc, g++ 버전이 설치되어 있는지 확인한다. 있으면 변경해준다. $ sudo update-alternatives --config gcc$ sudo update-alternativ
followers.tistory.com
'Programming > Tip' 카테고리의 다른 글
| Chat GPT를 활용한 서비스들! (0) | 2023.03.10 |
|---|---|
| 수식 & 알파벳 모음 (0) | 2022.08.23 |
| [Windows] cmd 창에서 한글이 깨질 경우 간단하게 임시 조치하는 방법 (0) | 2022.03.21 |
| 웹개발에 참고하기 좋은 사이트 정리 (0) | 2022.03.10 |
| 날짜 범위 (0) | 2022.01.14 |


댓글